If you’re looking to get the most out of your ZTE Blade 20, then rooting it is the way to do it. Rooting your phone gives you access to its full potential and allows you to customize and optimize it however you see fit.
There are several ways to root your ZTE Blade 20, some easier than others. This article will walk you through six of the easiest methods for rooting your phone. So whether you’re a beginner or an experienced user, there’s a method here for you!
As I already said, I will share six secure and easy methods with you. That’s because if any of the methods fail, then you can apply other methods. It’s my request to please follow this article to the end. So, let’s get started!
Page Contents
What do you mean by Rooting Android?
Rooting Android is the process of gaining privileged control or root access to your operating system. By rooting an Android phone, you can gain additional features and access otherwise restricted by default.
For example, many users root their phones to install custom software or modify system settings. Additionally, some unrooted phones limit which apps you can download or run on your device, but rooting can give you complete control over the apps that you use.
Overall, rooting your Android phone offers a wide range of benefits and allows for many types of customization and personalization. So if you want to take greater control over your mobile experience, consider rooting your Android device today!
But before you Root your phone, it’s essential to know the Advantages and Disadvantages of Rooting. So, let’s discuss that.
Advantages or Benefits of Rooting the ZTE Blade 20?
There are lots of Advantages of Rooting, and Here I have shown you 6 Pros of Rooting the ZTE Blade 20 Android smartphone:
- You have complete control over your smartphone.
- Once you Root, you can boost CPU and GPU performance by overclocking.
- You will be able to update ZTE Blade 20 to the newer android version.
- Rooting your phone will let you disable or block ads on any app.
- You can Install Custom ROM, Custom Kernel, and Mods on your smartphone.
- Easily remove Bloatware on ZTE Blade 20.
So, in the above section, I have covered the Top 6 Benefits of Rooting an android device. Now let’s discuss the Disadvantages or Cons of Rooting an android device.
Cons or Disadvantages of Rooting the ZTE Blade 20?
Now let’s discuss the various Disadvantages or Cons of Rooting ZTE Blade 20 Android smartphone:
- Once you Root, your device warranty will be void.
- You will not receive an official OTA update anymore on ZTE Blade 20.
- While Rooting, if anything goes wrong, then your phone will be completely dead/bricked.
- If your phone is Rooted, you can not use Banking Apps like Paypal or Payoneer.
- After Rooting, you might face lagging issues.
About ZTE Blade 20
Let’s quickly look at the key specifications of ZTE Blade 20.
- This phone comes with a 6.49 inches HD plus display, which is protected by Corning Gorilla Glass.
- ZTE Blade 20 has Mediatek Helio P70 chipset. It’s an Octa-core CPU
- We are getting Nubia UI on top of Android 9.0 (Pie)
- It has 4 GB of RAM and 128 GB of Internal Storage.
- Talking about the Camera, we get a Triple Rear-facing camera of 16 MP + 8 MP + 2 MP and an 8 MP Selfie Camera.
- ZTE Blade 20 comes with a Non-removable 5000 mAh battery, which also supports Fast Battery Charging.
MUST READ – Various Issues on the ZTE Blade 20 & How to Fix Them
Let’s Root ZTE Blade 20
Before we proceed to Root your ZTE Blade 20 smartphone, you have to fulfill the below Requirements:
- Make sure to Unlock the Bootloader On ZTE Blade 20. This step is essential; without unlocking, you cannot Root your phone.
- You need to Install TWRP Recovery On ZTE Blade 20. (NOTE:- TWRP File May Or May Not Be available as per the development)
- Before Rooting, make sure that your ZTE Blade 20 has more than 75% of Battery available.
- Make sure to Take a complete backup of your android. Having a backup will help you restore important files if you lose them.
- This method is only for the ZTE Blade 20 smartphone. Please do not try this method on any other smartphone. Otherwise, it will Brick your phone.

Warning: All the tutorials/ guides shown in this blog are not tested for each and every smartphone. As the Rooting process is almost the same for every smartphone.
If anything happens to your smartphone RootingSteps.com is not responsible for loss and damage to your smartphone. Try these methods with your own risk!
Root ZTE Blade 20 By Magisk: METHOD 1
Success Rate: 99%
- Download Magisk Zip file and save it to your phone’s internal storage.
- Now Boot ZTE Blade 20 into Recovery Mode by pressing the Volume Up + Power Button simultaneously.
- You will see the TWRP screen.
- Go to Install → Select the Magisk Zip file → Swipe to Install.

- Wait till the flashing process completes.
- After that, Reboot your device.
- That’s it. Your ZTE Blade 20 has been Rooted successfully.
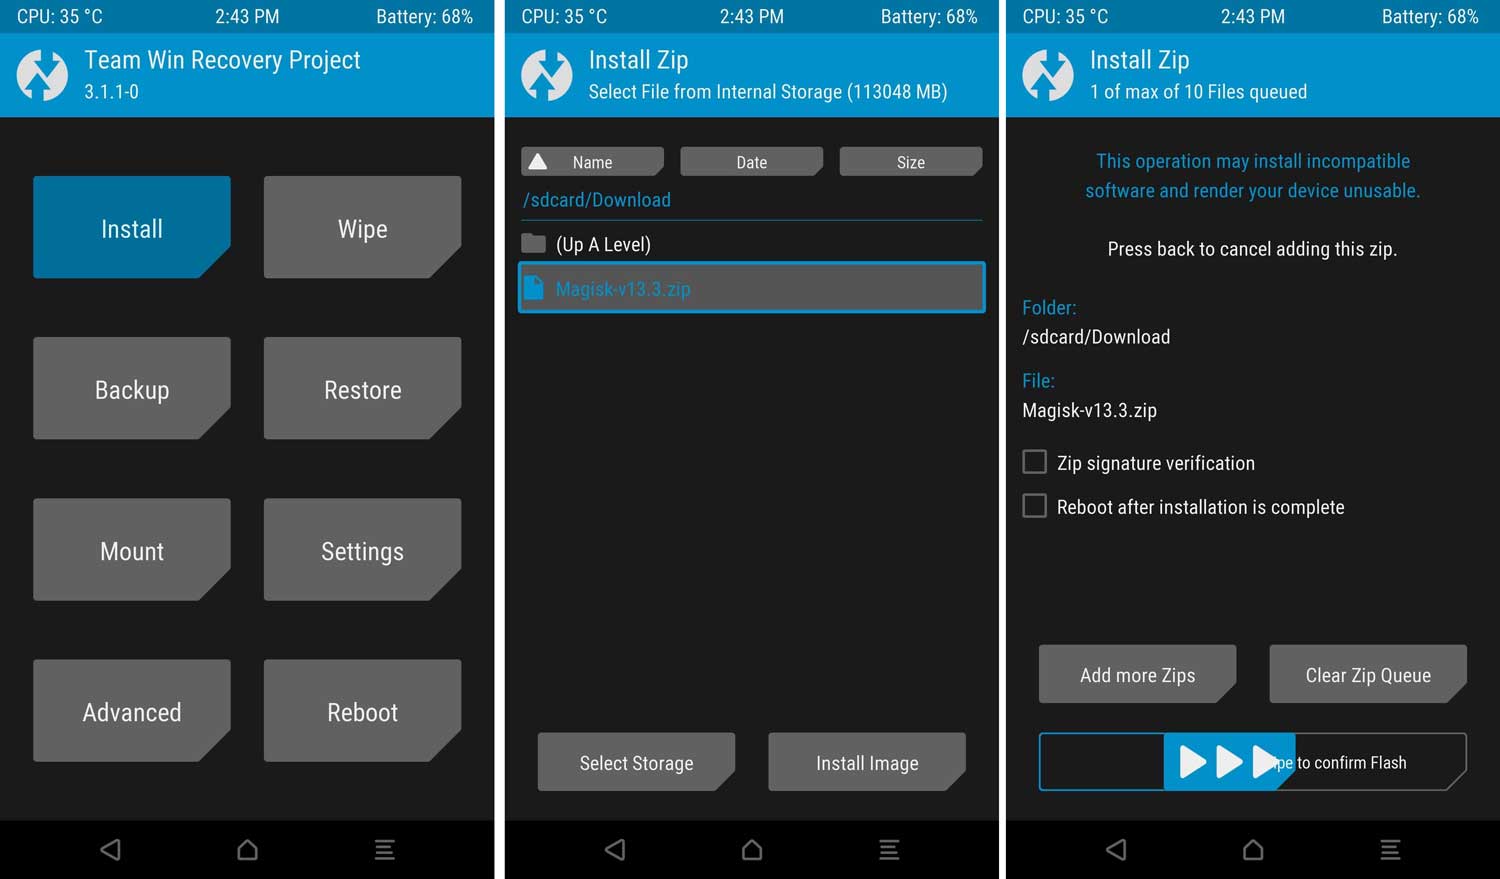
Once your device boots up, you will see the Magisk App in the apps menu. This app is very convenient for managing root permissions, installing modules, updating the app, etc.
RELATED – How to Install Custom ROM on ZTE Blade 20. (Custom ROM File May Or May Not Be available as per the development)
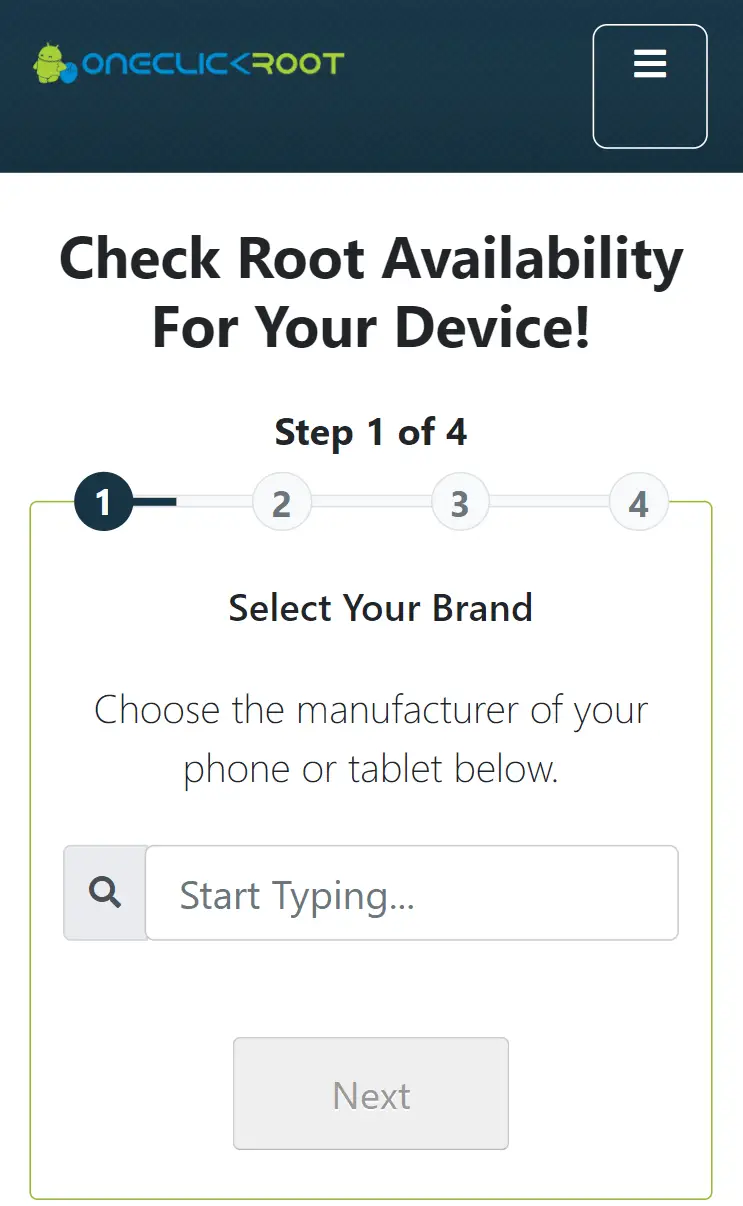
Root ZTE Blade 20 via PC: METHOD 2
Success Rate: 99%
- First off, visit OneClickRoot’s official site.
- Select ZTE from the list.
- Enter your ZTE Blade 20 device model.

- Choose your Android version from the list and click on Next.
- Furthermore, click on Verify Device Rootable button.
- You will see this message “Success, your device is rootable!”.
- Click on Purchase Now button to complete the checkout.
- Congratulations, you have successfully Rooted ZTE Blade 20.
Root ZTE Blade 20 By SuperSU: METHOD 3
Success Rate: 95%
This SuperSU method is the most used Rooting method. We need TWRP Recovery or any Custom Recovery installed on your ZTE Blade 20 smartphone for this method.
- First, download SuperSU Zip and save it to your ZTE Blade 20 internal storage.
- Power off your phone and boot into Recovery Mode by pressing Volume Up Button + Power Button at the same time.
- You will see the TWRP screen.
- Go to Install → Select the SuperSU Zip File → Swipe to Install.

- Once done, Reboot your phone.
- Well Done! You have successfully Rooted ZTE Blade 20.
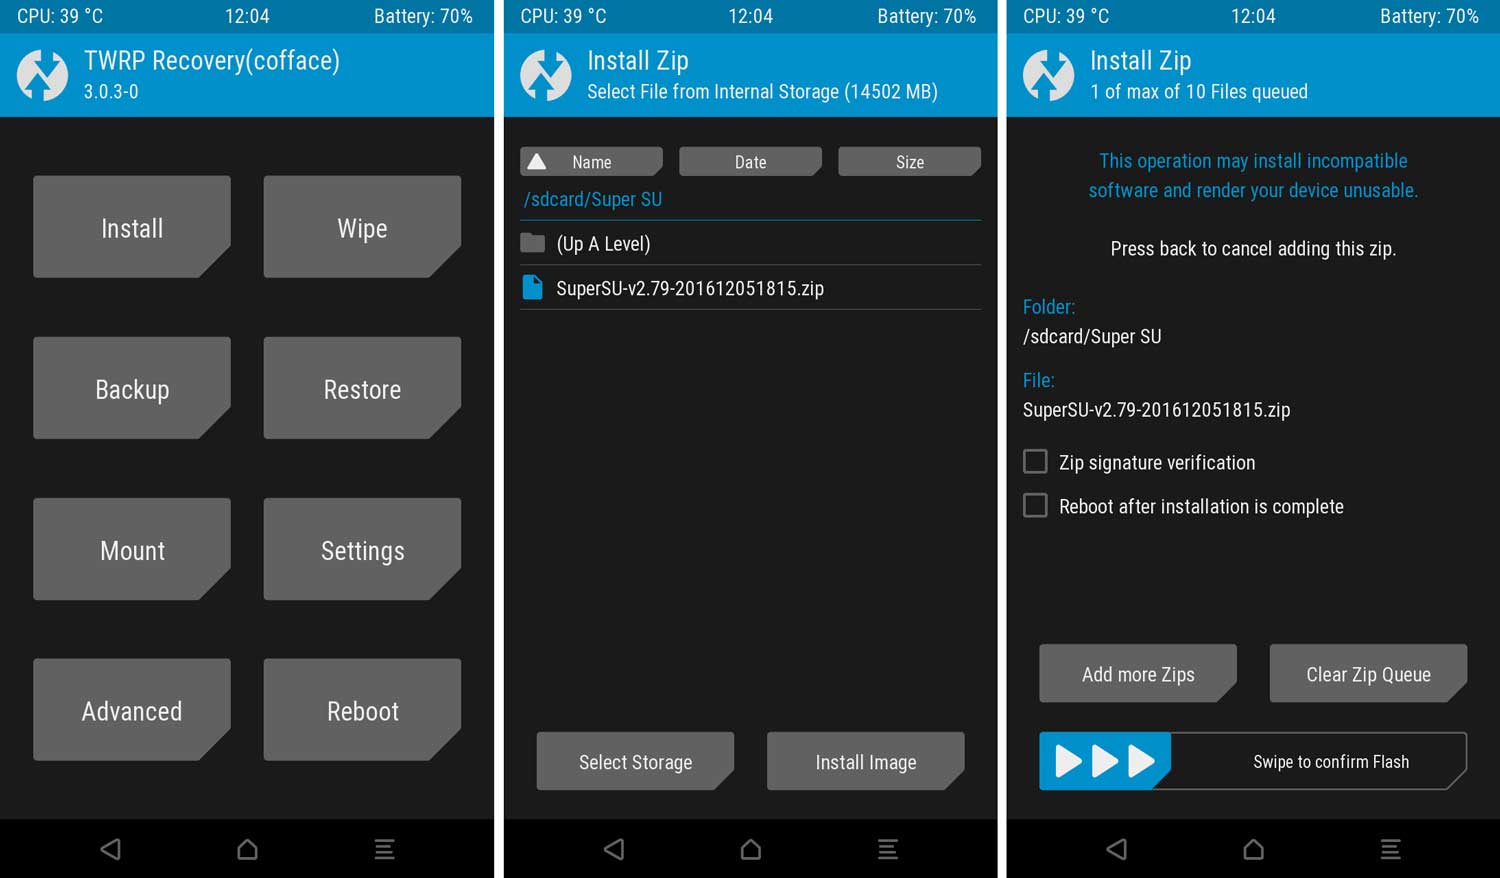
After your phone Reboots, you will see the SuperSU app on your apps menu. With the help of the superuser app, you can remove Root access anytime you want.
NEXT – How to Unroot ZTE Blade 20
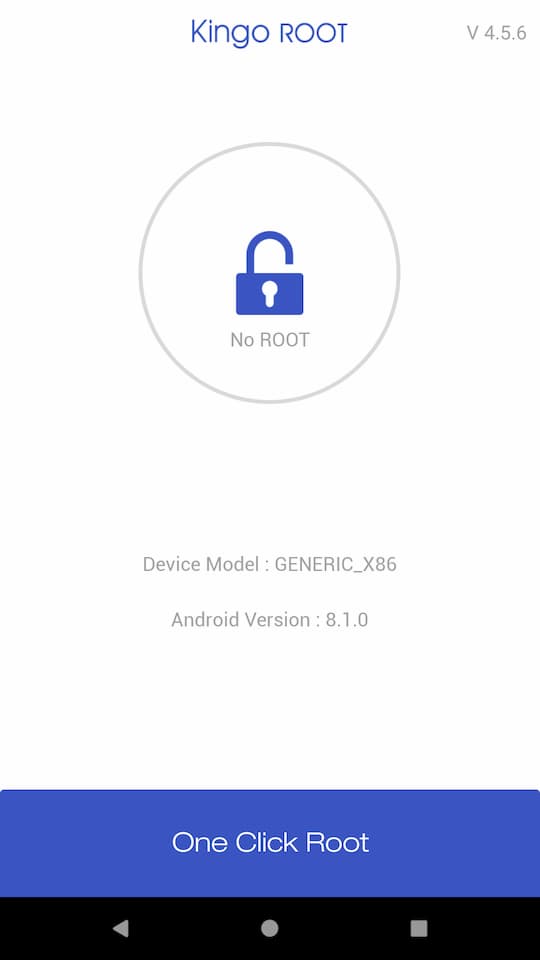
Root ZTE Blade 20 via KingoRoot App: METHOD 4
Success Rate: 85%
- First, download KingoRoot App and Install it on ZTE Blade 20.
- Make sure to enable the “Unknown Sources” option.
- Open the App and Tap on One Click Root, then tap confirm.

- Let the Rooting process complete.
- If you get any errors, you must check that you have a Strong Internet Connection.
- Well, that’s it. Your ZTE Blade 20 has root access now.
MUST READ – Install Stock ROM on ZTE Blade 20
Root ZTE Blade 20 By iRoot PC: METHOD 5
Success Rate: 80%
- First, download iRoot PC Software and Install it.
- Enable USB Debugging on ZTE Blade 20.
- To do that, Go to Setting → Developer options → Enable USB Debugging.
- Connect your Smartphone to your PC via USB cable.
- On your computer’s screen, click on the Connect device.
- Install the driver for ZTE Blade 20. (Check on the manufacturer’s website)
- Once your device is detected, click Root to begin rooting.
- Your device will restart after getting rooted.
- If you get any error messages, then check your Internet Connectivity.
- Congratulations! you have rooted the ZTE Blade 20.
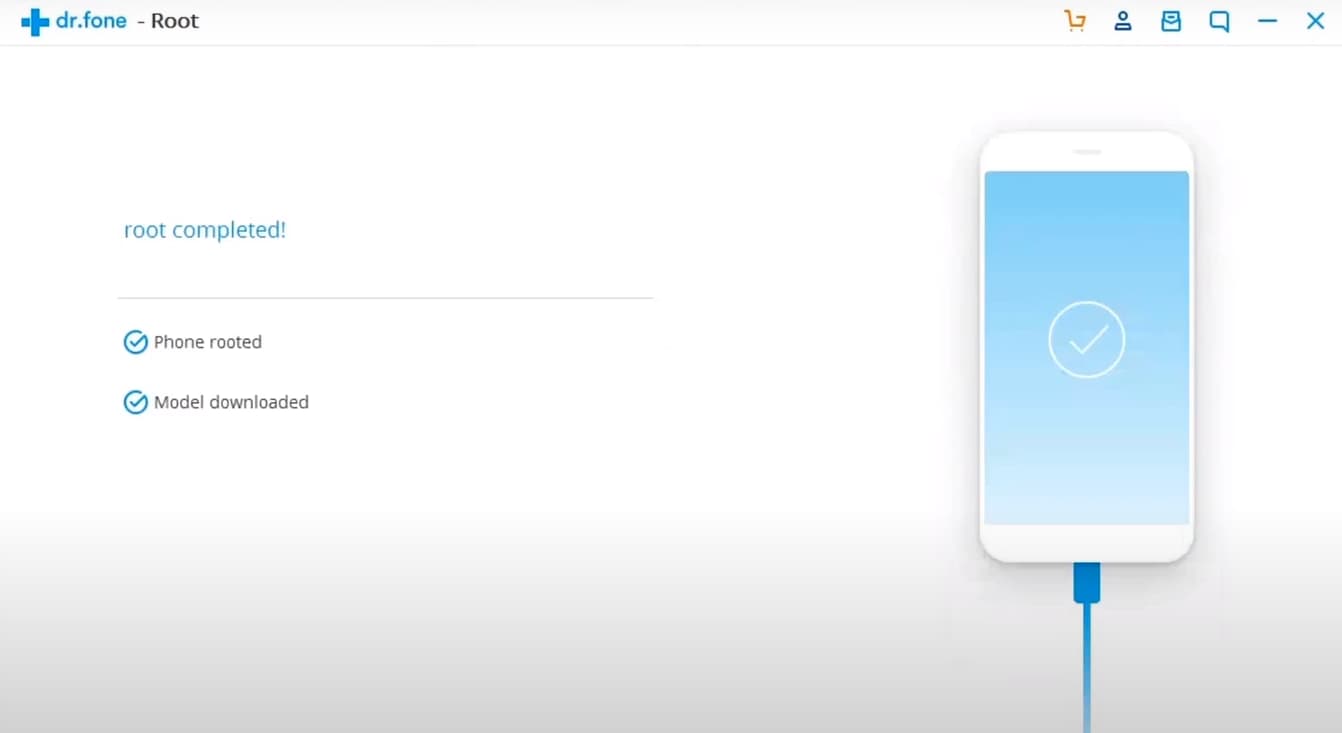
Root ZTE Blade 20 By PC: METHOD 6
Success Rate: 90%
- Download and install Dr.fone for PC.
- Enable USB Debugging on ZTE Blade 20.
- To do that, Go to Setting → Developer options → Enable USB Debugging.
- Connect your phone to a PC/Laptop via the original USB cable.
- Furthermore, make sure you have a strong Internet Connection.
- After your phone is connected, click Start; the program will find your device and prepare a way to root your phone.
- Click on Root Now to begin rooting your phone.
- Before the rooting process, the phone will ask if you would like to root the phone.
- Tap on Confirm to continue the rooting.

- Congratulations! You have successfully Rooted ZTE Blade 20.
If the above method doesn’t work for you, try the below methods.
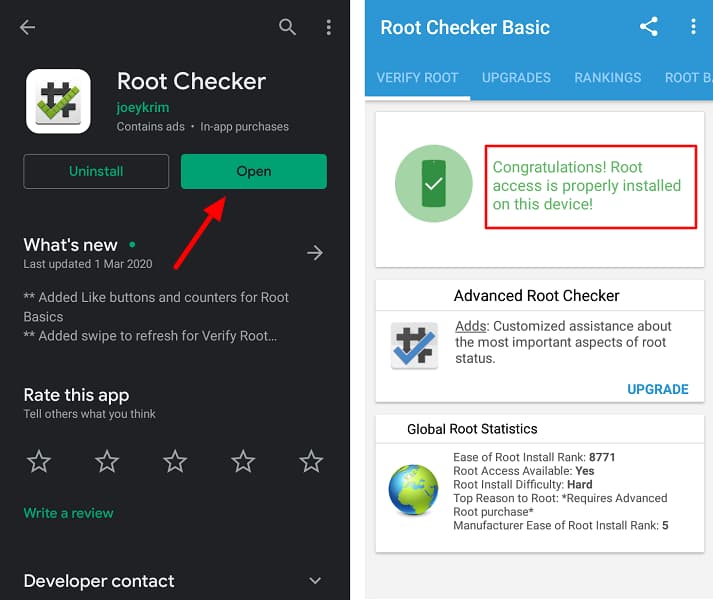
How to Check if Your ZTE Blade 20 Is Rooted or Not?
- Download and install Root Checker App.
- Open the app.
- Click on the Verify Root option.

- If your device is rooted successfully, you will get this message “Congratulations! Root Access properly installed on this device”.
Conclusion
Finally, we have come to the end of our article. We have discussed six methods to Root ZTE Blade 20. Of these six methods, OneClickRoot and KingoRoot App are the easiest ones.
If you are a beginner or don’t want to go through all the hassle, we recommend using either of these two methods. All the other rooting methods require some level of expertise and knowledge about Android rooting and custom recovery.
However, if you are an experienced user, you can try any of these five methods. If you face any problems during the rooting process, feel free to ask us in the comments section below. Thank You for reading our article!
Successfully rooted my ZTE Blade 20 smartphone. I have rooted it using Magisk Root method.
That’s great and thanks for sharing your valuable feedback with us